Node.js has become a preferred choice for building scalable and high-performance applications, thanks to its non-blocking, event-driven architecture. As applications grow in complexity and user base, performance bottlenecks can emerge, affecting speed and efficiency.
To ensure your Node.js application runs smoothly at scale, it is essential to follow best practices for optimization.
In this blog, you will be exploring key strategies to improve Node.js performance, from efficient memory management to utilizing caching and optimizing database queries.
If you are handling thousands of requests per second or aiming for smooth real-time processing, then hire Node.js developers who are skilled in helping you build a faster, more scalable application.
Monitor & measure your application performance
Before you start improving your application performance, the first step you should take is to monitor and measure its current performance status. This measuring process will help detect the flaws, inefficiencies, and areas where the real problem is.
When done with the measuring, you will need to make the right strategy based on the type of problem you found to get the desired result. To identify the current level of application performance, you would require to run different types of tests like:
1. Stress testing
It is designed and developed to test the ability of the machine, network, device, or code program. It checks how well a system performs outside of normal working conditions. The main purpose of this testing is to study the system's potential, how much it can tolerate before failing, and how it recovers after failing.
2. Load testing
It is a process of assessing the application's load, simulating the real-workload, and measuring the response and usage of the application. Furthermore, you can also test the app's potential of how much burden it can bear at the most before leading to failure.
3. Spike testing
This helps to evaluate your application's behavior when it experiences a massive yet unexpected rise or drop in load.
4. Scalability testing
It is used to test the load to measure the application's ability during a sudden spike or fall with massive user request loads.
5. Volume testing
A test performed to figure out the performance or behavior of the application under a huge amount of data.
When you are done performing any one or all of the above testing, you will get several important metrics like Average latency, response times, error rates, requests per second, throughput, CPU and memory usage, concurrent users, etc.
The next step is to re-run the test though you have implemented a specific optimization. This re-testing will help you verify if your changes had the required result you anticipated on the system or app’s performance.
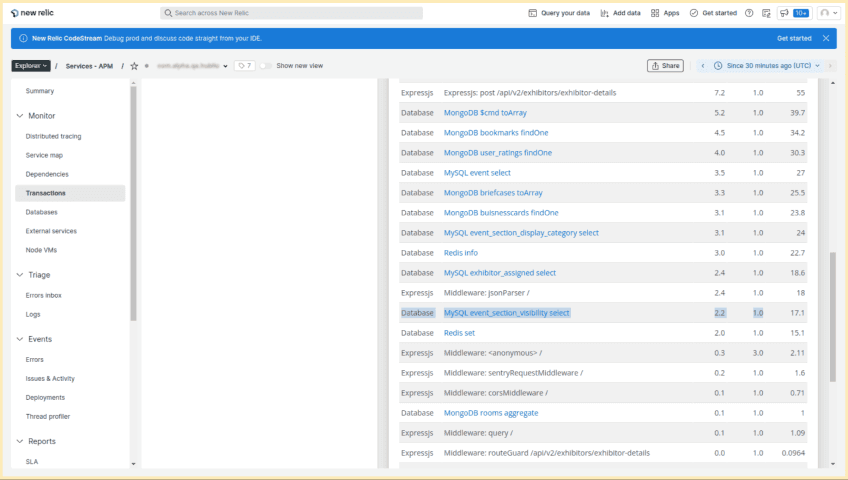
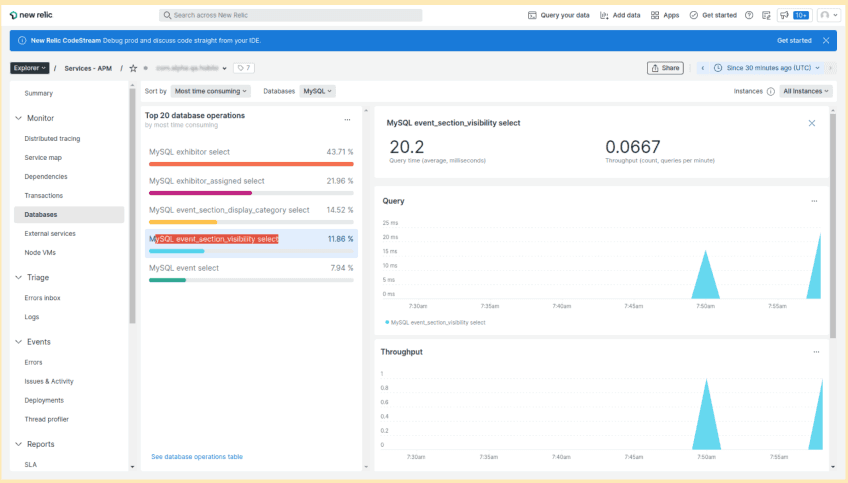
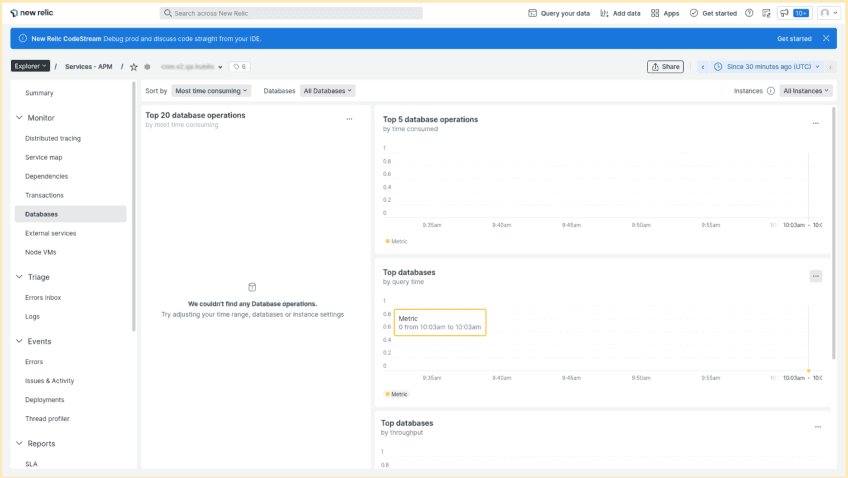
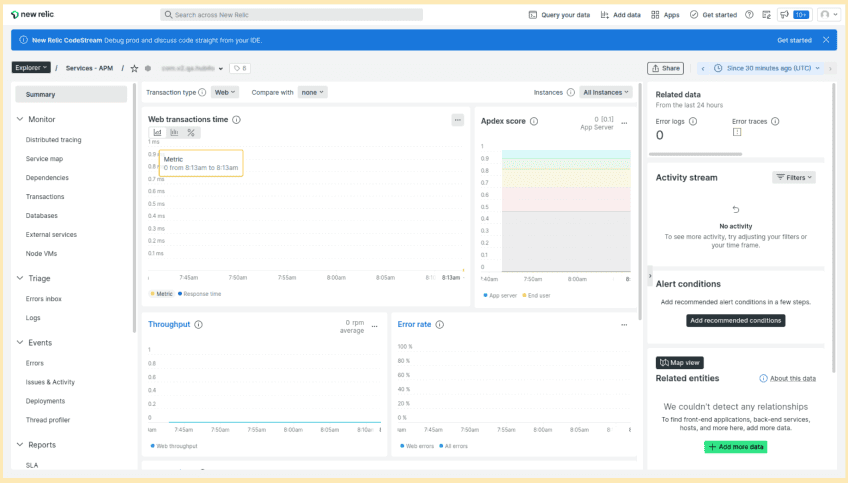
It is also important to keep track of your app’s or system's performance. To do that, you should do (APM) Application Performance Monitoring and maintain the track to observe the performance. There are different monitoring tools and solutions available for APM, we suggest NewRelic and AppSignal.
Both are easy to use. You can easily integrate them into the application. Once it is installed, you simply have to run the command mentioned below.
npm install newrelic
OR
npx @appsignal/cli install
This will automatically give you track of several performance metrics like response times, throughput, error logs, system availability, host metrics, etc.
Caching helps to reduce latency time
To improve web application performance, Caching the data is one of the most important strategies. The primary aim of caching the data is to increase the speed of data retrieval by:
-
Spending less time on computing operations
-
Doing I/O operations
This means retrieving data from a network or database.
Cache, also known as “short-term computer memory” is a high-speed data storage layer that stores a subset of data. It prevents the frequent request to retrieve data from the primary data storage location and responds to it from the stored data. This saves time, gives a faster response to the query, and delivers a better user experience.
The majority of the requests are common and frequent which does not change often. If your app receives a request for unchanged data, we can store it and use it to respond to the same query in the future. Caching is the ideal option to respond to the same type of request. It will certainly improve the performance and enhance the performance of those requests.
Furthermore, it also helps us to prevent server resources from getting stuck or plunge down unnecessarily for all such redundant computation calls of data.
This was all about the request responded to by the internal server. Now, what about the 3rd party API queries? These are the other classic applicants for caching. Caching will help us in fetching the data from external systems, storing it and safely reusing it for future requests.
In this case, we can store API requests in “Caching Layer” to avoid the additional network request and costs associated with such API calls.
There are a couple of ways to do Caching in an Application,
- In-Process Caching Solution
- Distributed Caching Solution
In-process caching
Store our actively used data in memory, from where we can retrieve it more quickly, Example: node-cache
Install: npm install node-cache --save
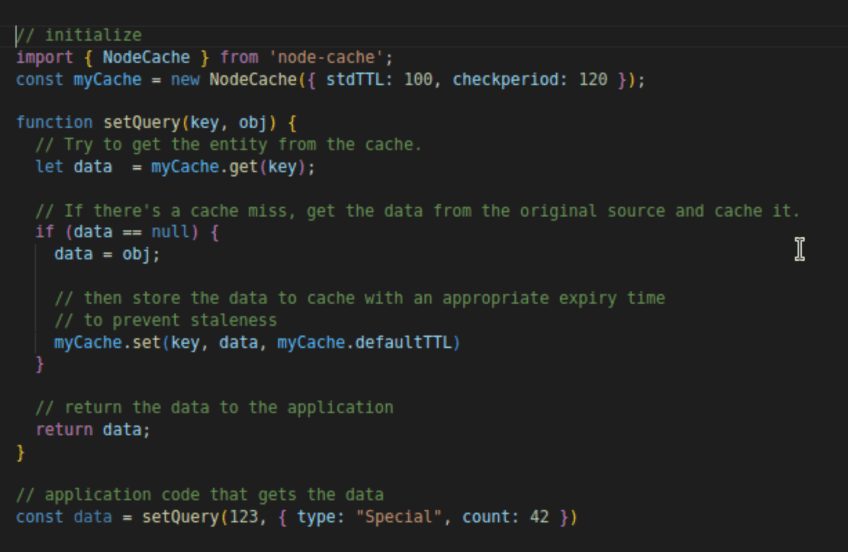
The drawback with an in-process cache solution is that it's tied to an application process and not perfectly suitable for distributed workflows, especially when caching the mutable objects [an object whose state can be improved after it is created].
Distributed caching solution
You can use a distributed caching solution such as Redis or Memcached.
These both solutions run independently on an application. Plus, these are more practical when scaling up the application on multiple servers.
Suggestion
Choose In-Process Caching Solution if your project is a simple small application or a small-scale project.
When you have a plan to resize your application in the future, you can always select Redis as a Distributed Caching Solution.

I/O Operations with timeouts
Timeouts are the easiest way to apply while building Node.js applications to prevent unwanted delays from happening. Assume, you own a server that is probably interacting with other external services and which again may be dependent and calling other services.
It seems you don’t have control over your servers. In this case, if any of the services is slow or unresponsive it will drive a slow or bad user experience.
As you don’t have full control over the servers, you cannot guarantee that your dependencies will respond as quickly as they usually do regardless of you not running into these issues. And this is why the timeout concept is important.
Let’s understand this even deeper. A timeout is a wait limit for a user fixed by the developer at the backend and it is set on a request. The reason behind this is, to tell and prepare the client about how long they should wait for a response.
After the request is raised by the client and if not responded to in a predefined time, the connection will automatically get aborted. This prevents the app from getting hanged infinitely.
Reference Example, HTTP requests in Node.js.
Note: By default, Axios call does not set any timeout, so you have to set a request timeout to prevent this by adding:

Here, Timeout of 2000ms (2s) is set as the default timeout for all HTTP requests made through axios.
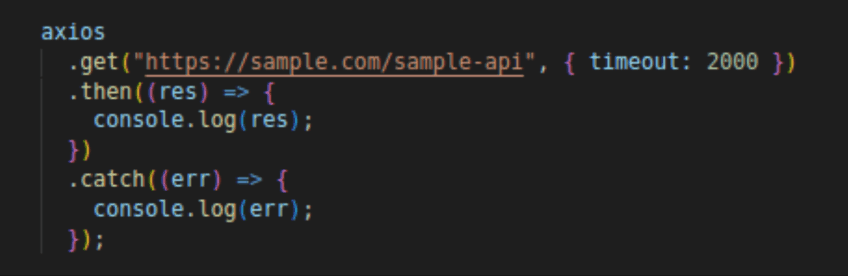
Note: Axios timeout value is a read timeout, which is different from a connection timeout. The read timeout is faster and the connection timeout is much lower compared to it.
Stop serving static resources and assets with Node.js
In order to get the best possible performance of your Node.js servers, ensure you never use them as static resources from the server itself such as JavaScript, CSS, or application’s image files, etc. Node.js is not designed with this mindset. So, when serving the assets from the main application consumes precious resources and impacts important business calculations.
Move the task of serving static files to a web server like Nginx. It usually performs optimizations that do not make sense to Node.js. This test shows that Nginx is two times faster at delivering static assets the same as Node.js delivers (using Express static middleware).
Another way to stop serving the static resources is to display static files by setting up a CDN proxy like Amazon CloudFront to cache your static content and serve it to the end-user as close as possible. This activity will prevent Node.js from serving the static resources and allow it to handle only the dynamic requests.
Automate load balancer: scale across multiple machines
Splitting the load enhances the life, longevity, and capacity of bearing the massive weight. The funda is clear, the more the audience, the more the space required to manage them.
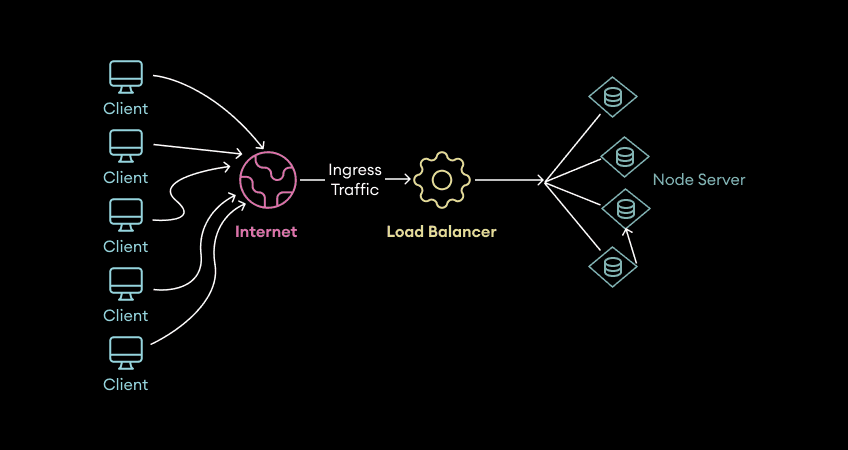
Here also, to scale the performance of the Node.js application, you just have to distribute the traffic to multiple machines. When you divide the traffic into multiple machines, you ensure your users an uninterrupted service.
Another smart move you can make is by making and pointing multiple load balancers to the same set of servers and requests to provide a fast response to each request and avoid any failure.
NodeJS express an example for load balancing:
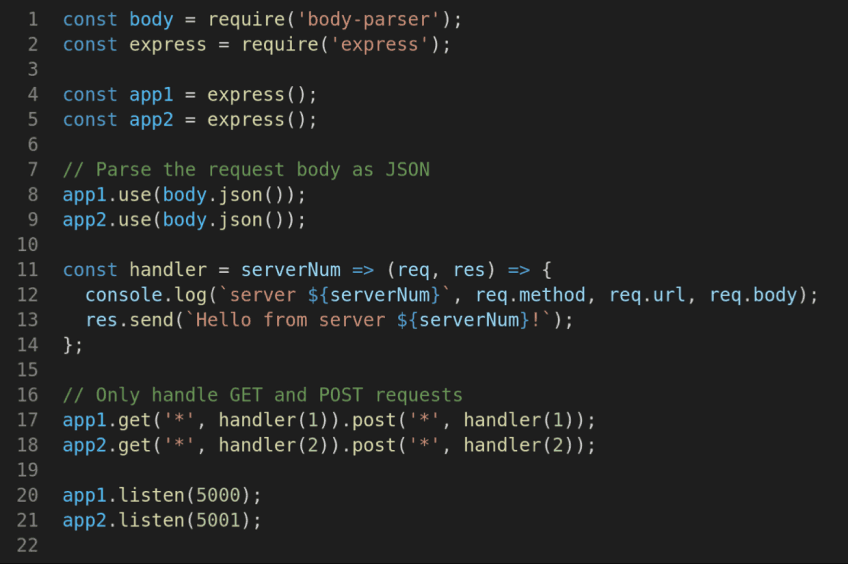
If load balancing works then you can get the console output look like:

Improve throughput by cluster
Clustering is to segregate groups with similar traits and assign them into clusters. In your Node.js application, the cluster is used to divide the server horizontally on a single machine by making a separate single port for workers that run concurrently.
It is a simple and common technique to lower downtime, outages, non-responsiveness, and slowdowns by distributing the connections across all the separate clusters so that the CPU cores are utilized to their full potential.
The primary reason for clustering into your Node.js application is it runs on a single thread and cannot take the benefit of multi-core systems properly.
Yes, one thing you can do is, cluster your Node.js server through the cluster module in the standard library.
Code reference from Standard Cluster module:

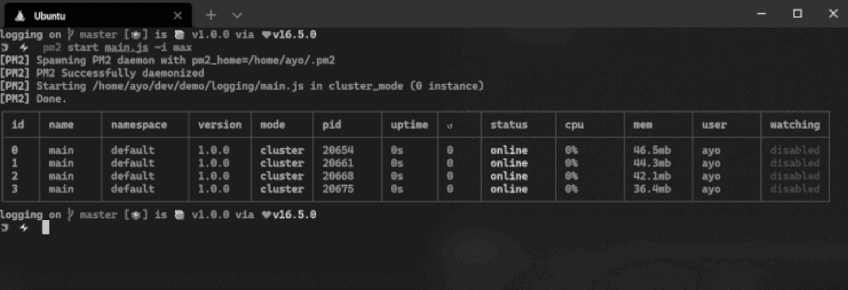
When you run this program, connections sent to port 3000 will be shared between the worker processes. Which will result:

By using the PM2 process manager, you get the best option for robust management of Node.js clustering. PM2 allows you to take care of spawning workers, distributing the incoming load between the workers, and stopping or restarting workers. In addition, this also helps us to monitor and tweak the performance of worker processes.
Additional tips to better your Node.js app’s performance
You now know the major tips you can use to improvise the performance. But, the tips do not end here. Below we have mentioned some key micro-optimization steps you can consider to improve your Node.js app’s performance at a greater scale.
-
The best always assures the best. When you are in the process of improvising your app’s performance, always use the latest version of Node.js.
-
Dependency usually kills. It steals your creativity, power, and time. Always pay close attention to your dependencies and attempt to omit them by choosing the most performant libraries where possible.
-
Build a basic understanding and coding skills within you so that when you are in trouble and have no time, you can write the code yourself and fix it in real-time. This activity of avoiding the dependencies will help you improve your Node.js app’s performance.
Example: Max use of Build-in Methods and Libraries like, lodash, Node-cache
- One thing you need to ensure that independent I/O operations should use asynchronous primitives like:
- Callbacks
- Promises
- Async/Await
Using these primitives improve downstream latency and also ensures a seamless operation flow.
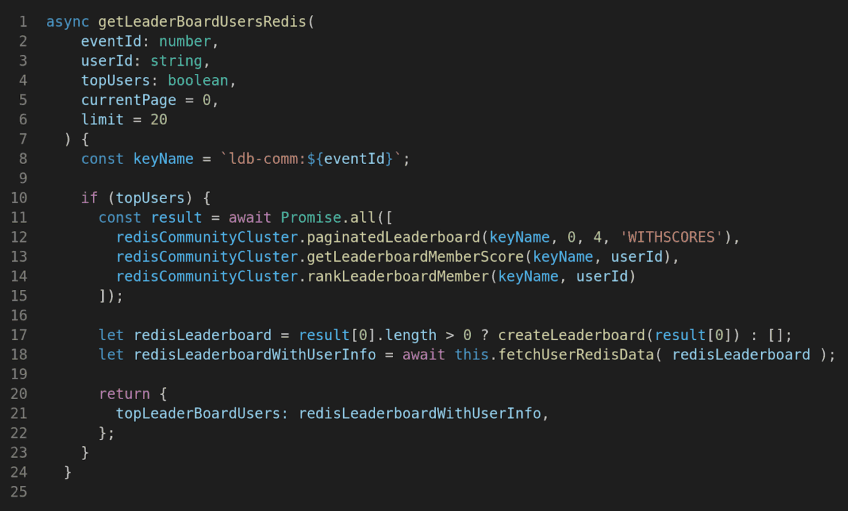
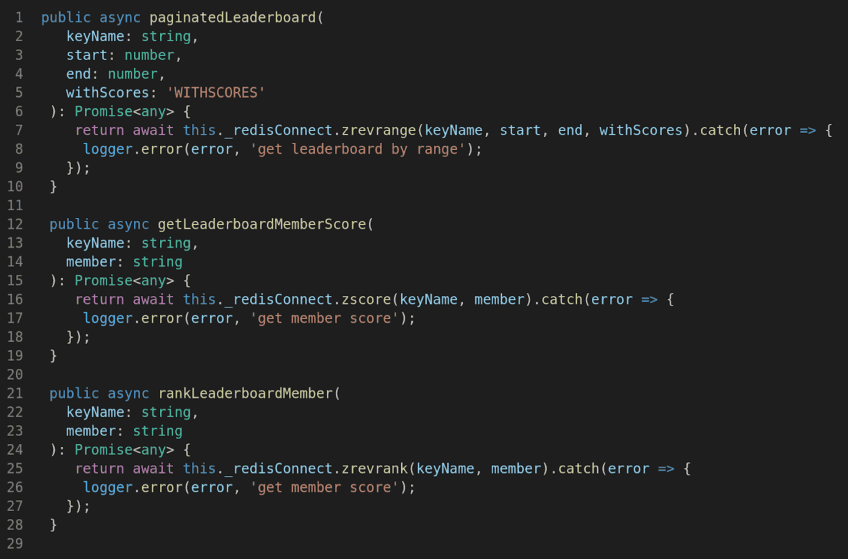
Example: List out all independent query calls before you start any implementation and place Parallel query calls by using Promise.all for all such individual independent queries.
This step of listing our independent query calls and using Promise.all will reduce time of each individual connection and query calls from the list upto the one, which usually takes a max time for query response.
Example: Push Individual query calls in an array
-
Use Node.js streams for optimal memory efficiency and reduced latency when working with large pieces of data.
-
Ensure Batch Processing for Analytics, Reports or Download / Export sheets

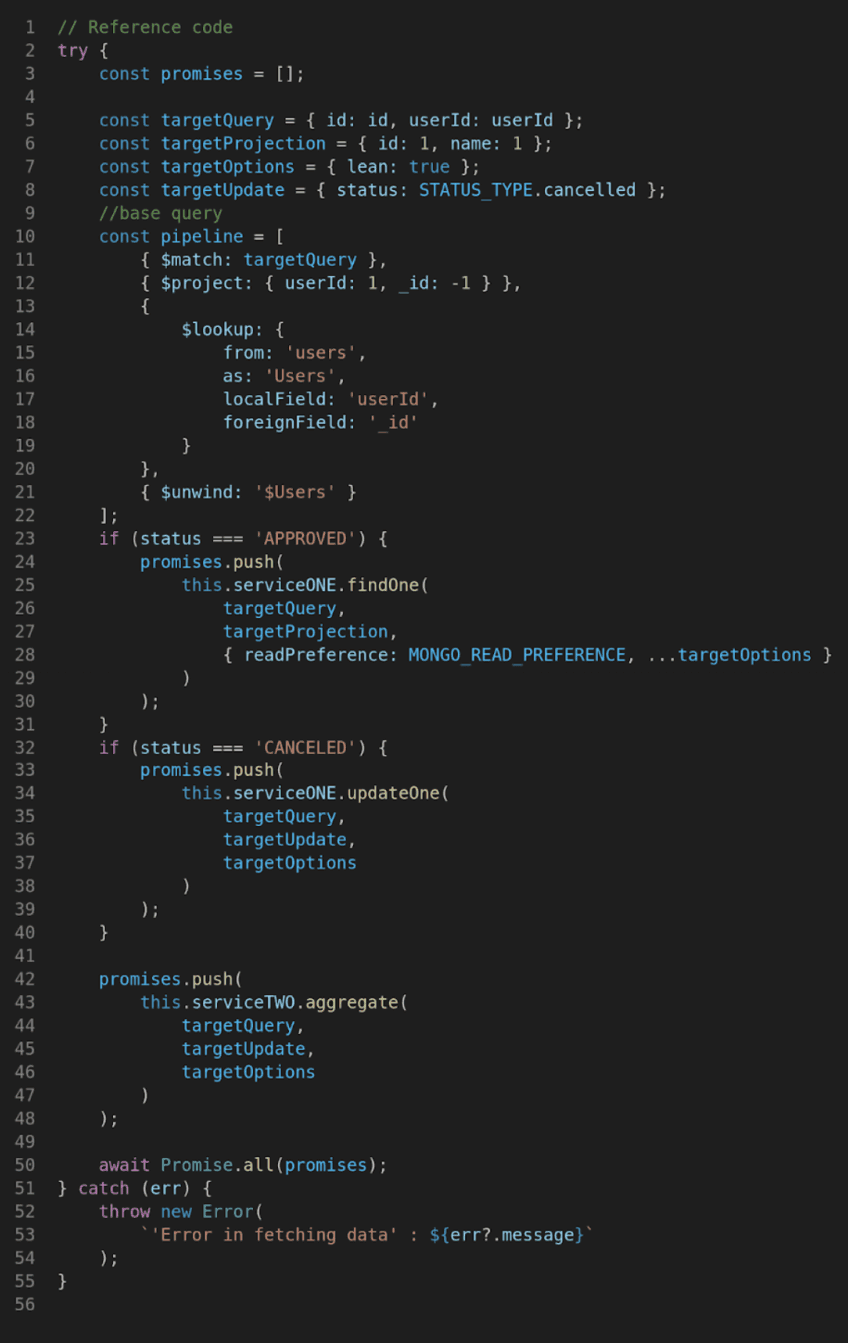
- DB Connections: Ensure DB Connections with Master-Slave Replication. DB connectors must use Secondary Preferred Read Replica OR Master-Slave Replication for DB connections where-ever you want LISTING PURPOSE QUERY CALLS.
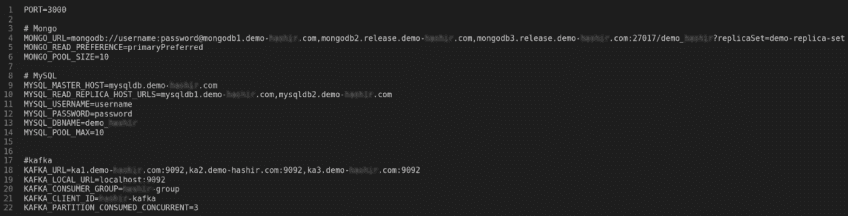
For MongoDB:

For MySQl:

-
In order to save your database queries from becoming a gridlock, you should practice optimization on a regular cadence and scale them appropriately.
-
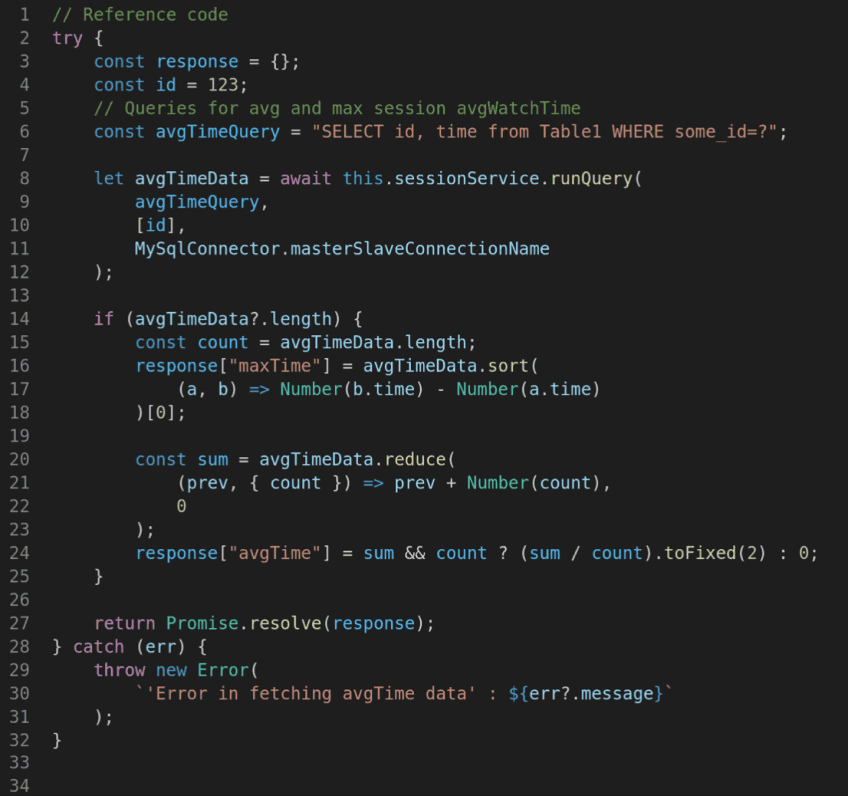
Avoid conducting Aggregation queries or Multi Joins.
The best practice is to handle the cases like, Aggregate, Avg, Max etc. is simply to select queries and find alternate ways to solve it.
Example: Instead of using Avg and Max queries, we can collect such results by simple Select query.
- Always use pre-defined Projections for query calls - with any sql or noSql databases, MongoDB and MySQl etc.
- This means, you need to perform the queries for the required columns only. The db query then will run for the required columns and no unwanted columns are fetched.
- Subqueries should be avoided. If and when required, based on the situation, we can perform smart conditional logics, functions.
- You have the option to utilize proper indexes for faster search results.
- Omit query calls in loop. Ignore adding query calls in any loop.
- You can select a smart conditional approach with a single call and connection. For example, you can prepare an array and use an IN query to collect all data in a single call and connection.
These are a few additional tips that top Node.js development companies utilise for app performance optimization and improvisation that you can take care of during the development phase. Not all phases are weak.
Hence, optimize those that you detect needs optimization. Once you identify the hotspots of the application, you work to optimize should start then and that too on a specific area only.
Note: Hotspots may change over time, so you need to keep testing the app. You can keep an eye on any new changes by using tools like NewRelic, AppSignal to track such changes.
Conclusion
Optimizing Node.js performance requires a structured strategy, starting with a thorough performance test to pinpoint bottlenecks before making any improvements.
Identifying the root cause is crucial, whether it's inefficient database queries, excessive event loop delays, or unoptimized middleware.
Throughout this blog, we have explored practical strategies backed by coding examples to help scale your Node.js application efficiently. The six key techniques we discussed, along with additional best practices, provide a well-rounded approach to boosting performance.
These are not just theoretical suggestions—they’ve been tested and implemented in real-world scenarios.
If you're working on optimizing your Node.js application and run into challenges, feel free to reach out. Our team has hands-on experience in fine-tuning Node.js applications for high performance and would be happy to assist.