Since the invention of the World Wide Web, several web technologies like RPC and SOAP have been introduced for building web services. However, these technologies relied on complex definitions, making communication between systems cumbersome.
This led to the rise of REST, an architectural style that simplifies network-based application design while reducing complexity.
In this blog, we’ll walk through the process of building a secure REST API using Node.js. Node.js has transformed server-side development, making it a top choice for front-end developers looking to build efficient back-end services.
Before we dive into the implementation, let’s first understand what REST is and why it plays a crucial role in modern web application development.
What is REST?
In simple words, REST is a design pattern or an architectural style for APIs. Roy Fielding first introduced it in his PhD dissertation in 2000.
A RESTful web application exposes its own data as resources, allowing clients to access and interact with them. REST enables clients to perform actions on resources, such as editing an existing post or creating a new user.
To ensure your APIs are truly RESTful, you must follow a set of constraints while designing them. These constraints make APIs easier to use and understand. This means that a web developer using your API for the first time can quickly grasp how it works.
REST stands for Representational State Transfer, which means that when a RESTful API is called, the server transfers a representation of the requested resource’s state to the client.
For example, when a developer calls an Instagram API to fetch a specific user, the API returns information such as the number of posts, followers, username, and more.
Most APIs use JSON to represent data, but they can also return data in HTML or XML formats.
REST operates using HTTP methods like GET, PUT, POST, and DELETE to manage data over the web. Its architectural style reduces bandwidth usage, making applications more efficient for the internet.
Many businesses that build scalable and efficient APIs opt for Node.js development services to ensure a seamless and high-performance API structure that follows REST principles.
REST is often referred to as the "language of the internet", as it provides a stateless and standardized way to access and manipulate data through the HTTP protocol.
Below are the available HTTP operations:
GET
This retrieves a resource’s representation at the specified URI. The body of the response message provides us the details of the requested resource.
POST
This operation creates a new resource at the targeted URI. The request message’s body provides the details of the new resources. It’s important to note that POST can also trigger operations that don’t create resources.
PUT
PUT is responsible for either creating or replacing the resource at the targeted URI. The request message’s body specifies the resource to be updated or created.
PATCH
PATCH carries out the partial update of a resource. The request body contains the set of changes that are to be applied to the resource.
DELETE
DELETE discards the resource at the targeted URI.
Read more: Top tips & tricks to improve Node.js application performance
Principles of REST
As discussed earlier, Dr. Fielding was the first come up with the term REST. And he also gave the below six guiding principles of REST.
Stateless
Requests that are sent from a client to the server consists of all the essential information which is required for its complete understanding. These requests can be query-string parameters, body, URI, or even headers.
The body is responsible for holding the state of the requesting resource. Whereas, URI is responsible for identifying the resource.
After the completion of the processing by the server, an appropriate response via status, header, or response body is sent back to the client.
Client-server
Client-server consists of a uniform interface which acts as a barrier separating clients from the servers. This separation improves the user interface’s portability over multiple platforms. It also increases the scalability of the server components.
Uniform interface
REST has defined the four below interface constraints to obtain uniformity throughout the application.
- Resource identification
- Usage of representations for resource manipulation
- Self-descriptive messages
- Hypermedia as application state’s engine
Cacheable
Applications are made cacheable to deliver better performance. This is achieved by labelling the server’s response as either cacheable or non-cacheable implicitly or explicitly.
In case, if the response is defined as cacheable, then the response data for all the equivalent responses in the future can be reused by the client cache. Moreover, it also helps in avoiding the reuse of stale data.
Layered system
The layered system architecture limits component behavior to provide more stability to the application. This architecture also provides shared caches which promotes scalability. Moreover, the architecture also enables load balancing.
The layered architecture also contributes in enhancing the application’s security since the components of each layer cannot interact apart from the ones in their immediate layer.
Code on demand
Code on demand is used the least since it’s an optional constraint. It permits the applets and the clients code to get extended and downloaded through the interface which is used within the application.
In simple words, it creates a smart application that doesn’t rely on its own codes; thus, simplifying the clients.
Read more: 27 Development Practices our NodeJS Developers Adhere to
Setup
The first thing you’ve to ensure is that you’ve the latest Node.js version. Here I’ll be using the 8.11.2 version from nodejs.org. The next step is to ensure that you’ve MongoDB installed. If not, then install it from www.mongodb.com.
After that create a folder and name it example-rest-api. We’ll use this folder for our project.
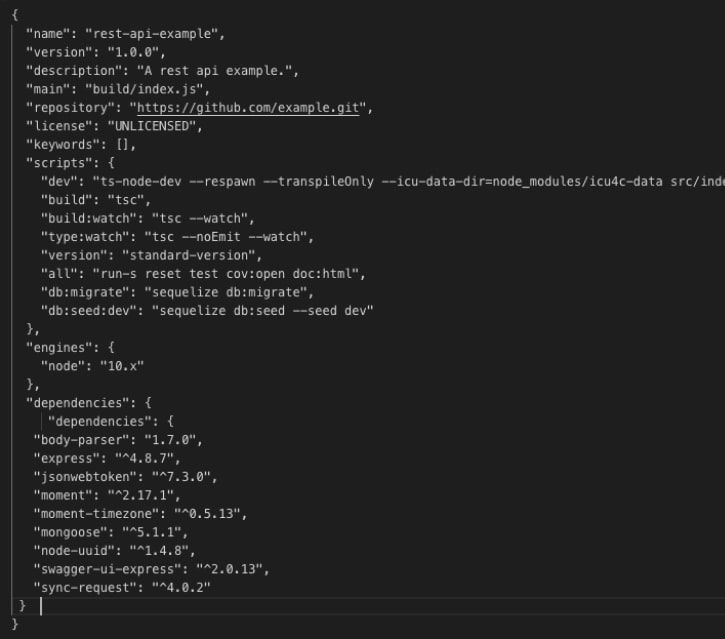
After naming it, open either the terminal or the git CLI console in the folder and create package.json file by running npm init . We’ll also use Express on this project.
Creating the Account Module
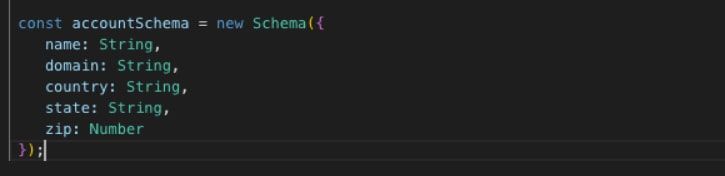
To create the account module, we will use Mongoose. It’s an ODM (object data modelling) which creates the user model within the account schema.
First, we must create the schema in /account/models/account.model.js:
The attachment of schema to the user model becomes easy once we define it.
const accountModel = mongoose.model(‘Account’, accountSchema);
Once this is completed, we can use it to implement all the CRUD operations within our endpoints.
Let’s begin with “create account” operation by defining route in account/routes.config.js
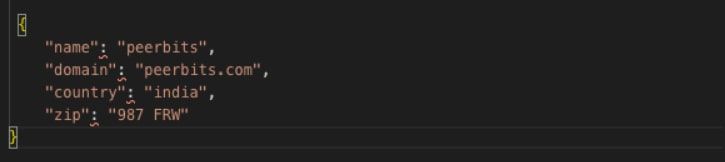
Now, at this instant we can verify our Mongoose model by simply running the server along with sending a POST request to /account with some JSON data.
We can also hash the password appropriately with the help of controller in /accounts/controllers/account.controller.js
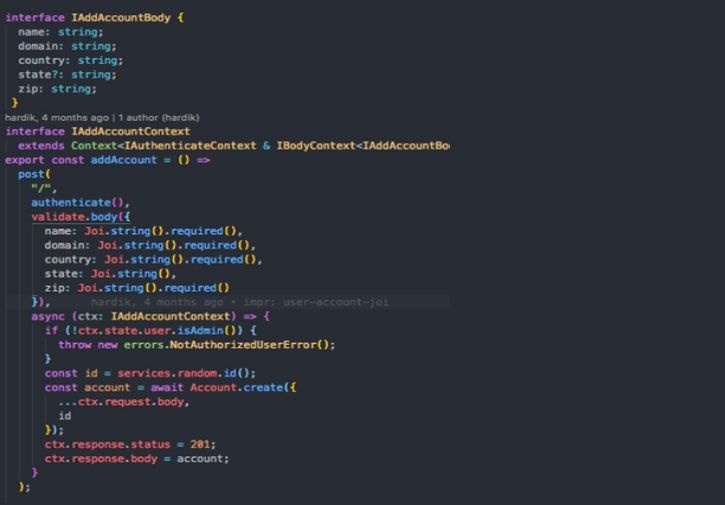
We know that Post API can be used to add new account request. In this case, it creates the account’s interface. Initially, the joi() library starts the validation check. It verifies if the source of the request is authorized or not.
If the request has come from an unauthorized user, then it will send an error. Whereas, if the request has come from the authorized user, it will add the record to the database. Once the task is successfully completed, it will send a 201-status code that would consist of an account object.
The account will be implemented as a GET at /account/ by the following controller
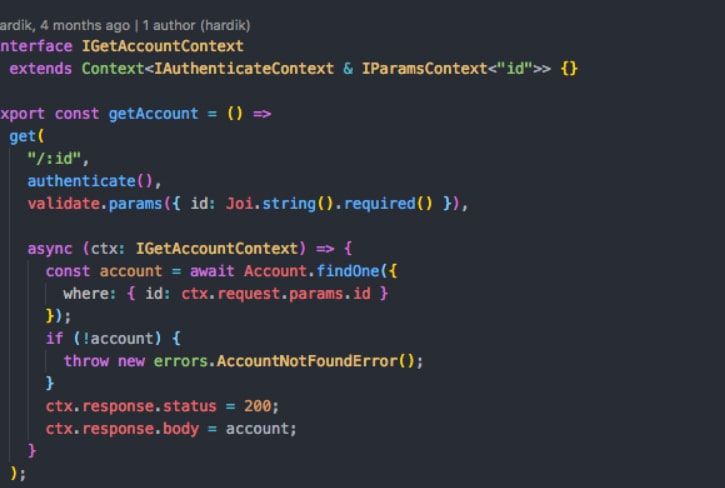
Get by ID, as the name suggests this operation is used to call record of any ID. The above endpoint returns the response as per the requested account ID.
It will first check if the requested account ID exists in the database. If it doesn’t exist, then it will send “not found” error in response. In case, if the account ID exists, then it will send status 200 along with account single object.
The account list will be implemented as a GET at /accounts/ by the following controller
And the last part to be implemented is the DELETE at /accounts/:accountId.
Our controller for deletion will be
As the name suggests, the Delete API is used to delete a record. In this, it first checks the request authorization. If it finds the request authorized, then it successfully deletes the records from the database and returns 204 status code in response.
Now we have all the necessary operations that are required to manipulate the user resource. Moreover, we don’t need user controller for further processes. The prime objective of this code was to give you the core concepts of using REST pattern.
We’ll have to return to this code for the implementation of some permissions and validations. But before we do that, we’ll need to build our own security. So, let’s create the auth module.
Creating the Auth Module
We need to generate valid token for the current account before we start securing the account module with the implementation of validation and permission. Here we will generate a JWT in response to the email and password provided by the user.
JWT is an excellent JSON web tokens that can be used securely to make a large number of requests without validating repeatedly.
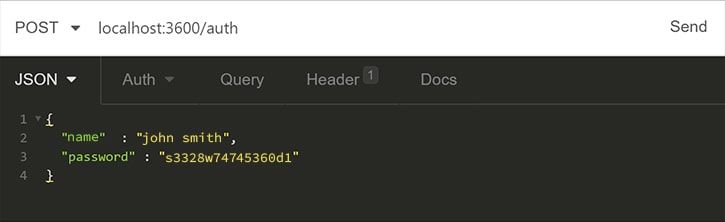
Here, we’ll first create an endpoint for POST requests to /auth resource. The request body will comprise password and user email.
We should validate the user in /authorization/middlewares/verify.user.middleware.js before engaging the controller.
Now, all we need is to invoke the appropriate middleware in /authorization/routes.config.js: along with creating route.
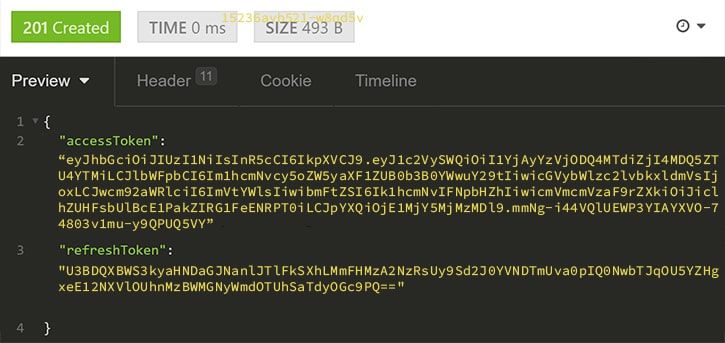
The response will consist of the generated JWT in the accessToken field:
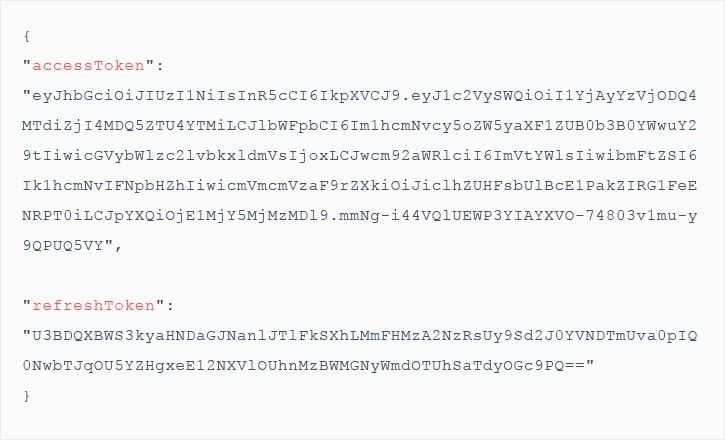
After the creation of token, we can use it inside the Authorization header along with using the form Bearer ACCESS_TOKEN.
Creating Permissions and Validations Middleware
The first step is to define who can use the users resource. There are below scenarios that we’ll have to manage:
- Public for the registration process (creating users). We won’t be using JWT for this scenario.
- Private for admins to update user and for the logged-in user
- Private for admin only, for the removal of user accounts.
After identifying these scenarios, we will require middleware which would always validate the user if it’s using a valid JWT. The middleware in /common/middlewares/auth.validation.middleware.js.
We will also use HTTP error codes for managing request errors:
HTTP 401 will be used for an invalid request.
HTTP 403 will be used for valid request with either an invalid token or a valid token with invalid permissions.
Here the middleware is generic. In case, the required permission level and the user permission level coincide in even one bit, then the result will be greater than zero. Thus, we can allow the action to proceed. Otherwise, HTTP 403 will be returned.
Running and testing with JEST
Jest is a decent JavaScript testing framework which focuses largely on simplicity. It works with projects by using TypeScript, Node, Angular, Vue, Babel, React, and many more.
Jest carries on with reliability run tests in parallel after ensuring that the tests have a unique global state. It makes the things fast by running the previously failed tests first and subsequently re-organizing the runs.
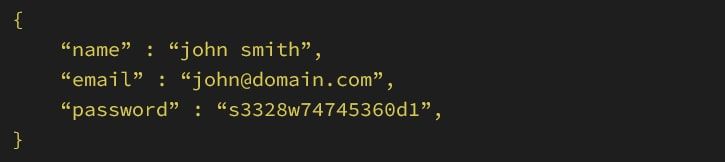
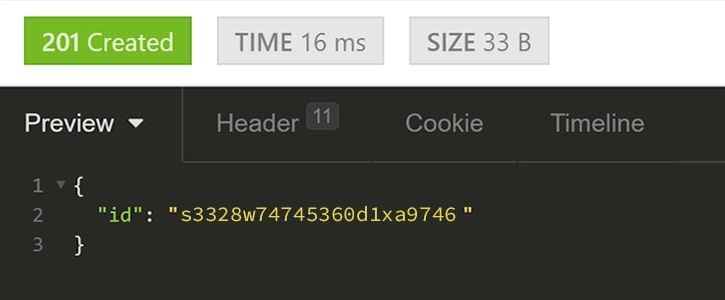
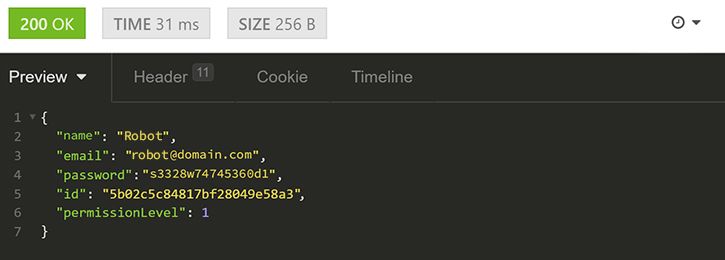
Now, to create an account, we will need to POST all the required fields as per the appropriate endpoint and subsequently store the generated ID.
After this the API will respond with the account ID:
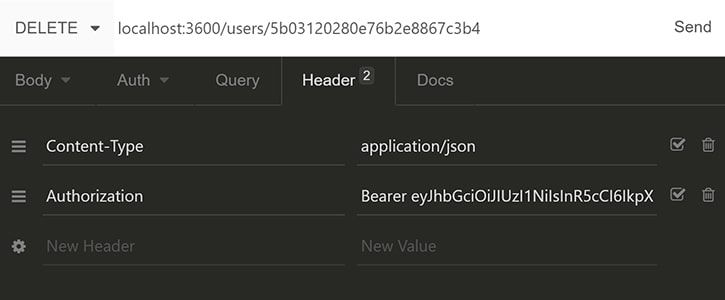
Now it’s possible to generate the JWT using the /auth/endpoint:
We should receive a token as our response:
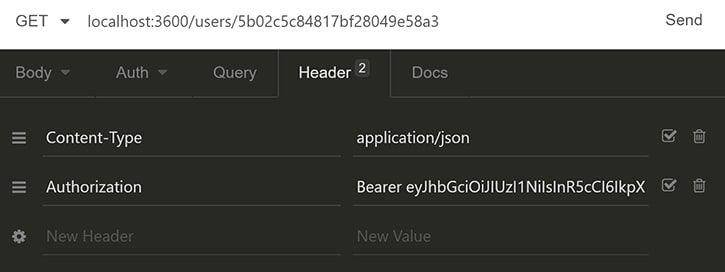
Take the accessToken, put a prefix Bearer to it and add it to the request headers under Authorization:
After implementing the permissions middleware, if we don’t do this now then all the requests except the registration would return the HTTP code 401. With the presence of a valid token in place, we get the following response from /accounts/: accountId:
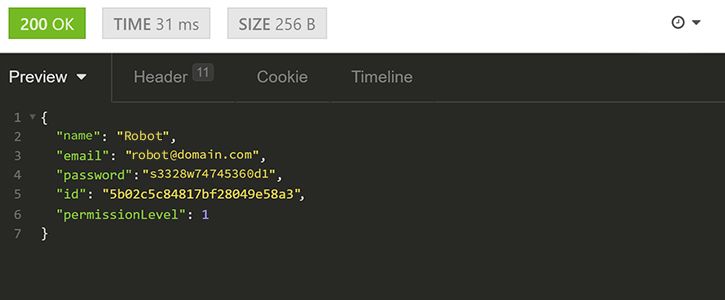
Just to inform that we are showing all the fields for the sake of simplicity and educational purpose. The password should never be displayed in the response.
Let’s get the list of accounts:
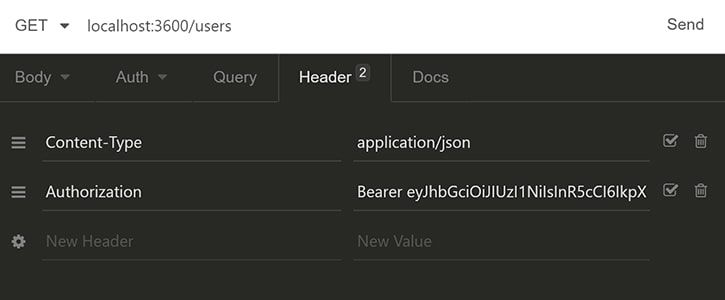
We get a 403 response.
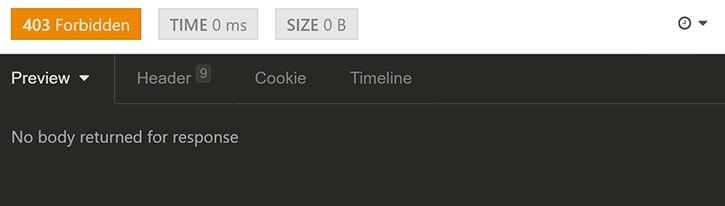
This means that our account does not have the permissions to access this endpoint. So, we will need to change the permissionLevel of our account from 1 to 7 manually in MongoDB. After that we can generate a new JWT.
Once it’s done, we receive the proper response:
Next, we will test the update functionality by sending the PATCH request along with some fields to our /accounts/:accountId endpoint:
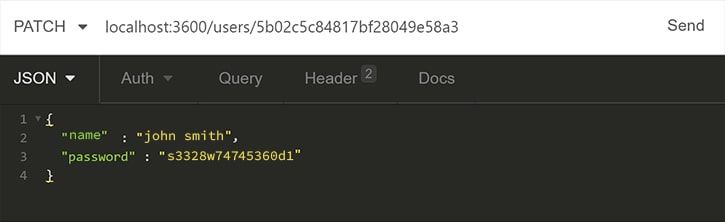
Here we expect a 204 response as a confirmation for the successful operation. However, we can request the account once again to verify.
Finally, we require to delete the account. For this we’ll need to create a new account as described in the above code. (don’t forget to note the account ID) We also need to ensure that we have the appropriate JWT for an admin account.
At last, we send a DELETE request to /accounts/: accountId. For this we must receive a 204 response as confirmation. We can verify it again by requesting /accounts/ to list all existing users.
Conclusion
Building a secure REST API in Node.js is achievable with the right approach, but maintaining security requires continuous effort. Proper validation helps prevent malicious inputs, while error reporting and unit testing allow early detection of vulnerabilities.
Access control is another crucial aspect. Users should not be able to modify their own permissions, and admins must not have the ability to remove themselves. Additionally, protecting sensitive information is essential to prevent data leaks.
For businesses looking to develop secure and scalable APIs, it is a good idea to hire Node.js developers who have experience in implementing best security practices.
By following these methods, you can build a reliable and secure API. I hope this guide was helpful—stay tuned for more insightful tutorials!